Steem Developer Portal

JS: Client Signing
By the end of this tutorial you would know how to sign, verify broadcast transactions locally on Steem.
Full, runnable src of Client Signing can be downloaded as part of the JS tutorials repository.
This tutorial gives you overview of how client side transaction signing works under the hood.
Purpose is to guide you through the steps required so that you could adapt this in your own applications.
We have predefined accounts to select for you to quickly use and few transaction types to test the process.
Intro
Client side signing of transaction is yet another way of interacting with Steem blockchain. Compare to Steemconnect method, client signing doesn’t rely on other servers to generate and verify transaction, except when transaction is broadcasted to the network, it should be routed through one of the servers connected to that network or blockchain. It can be your own local machine running Steem blockchain or it could be any other publicly accessible servers.
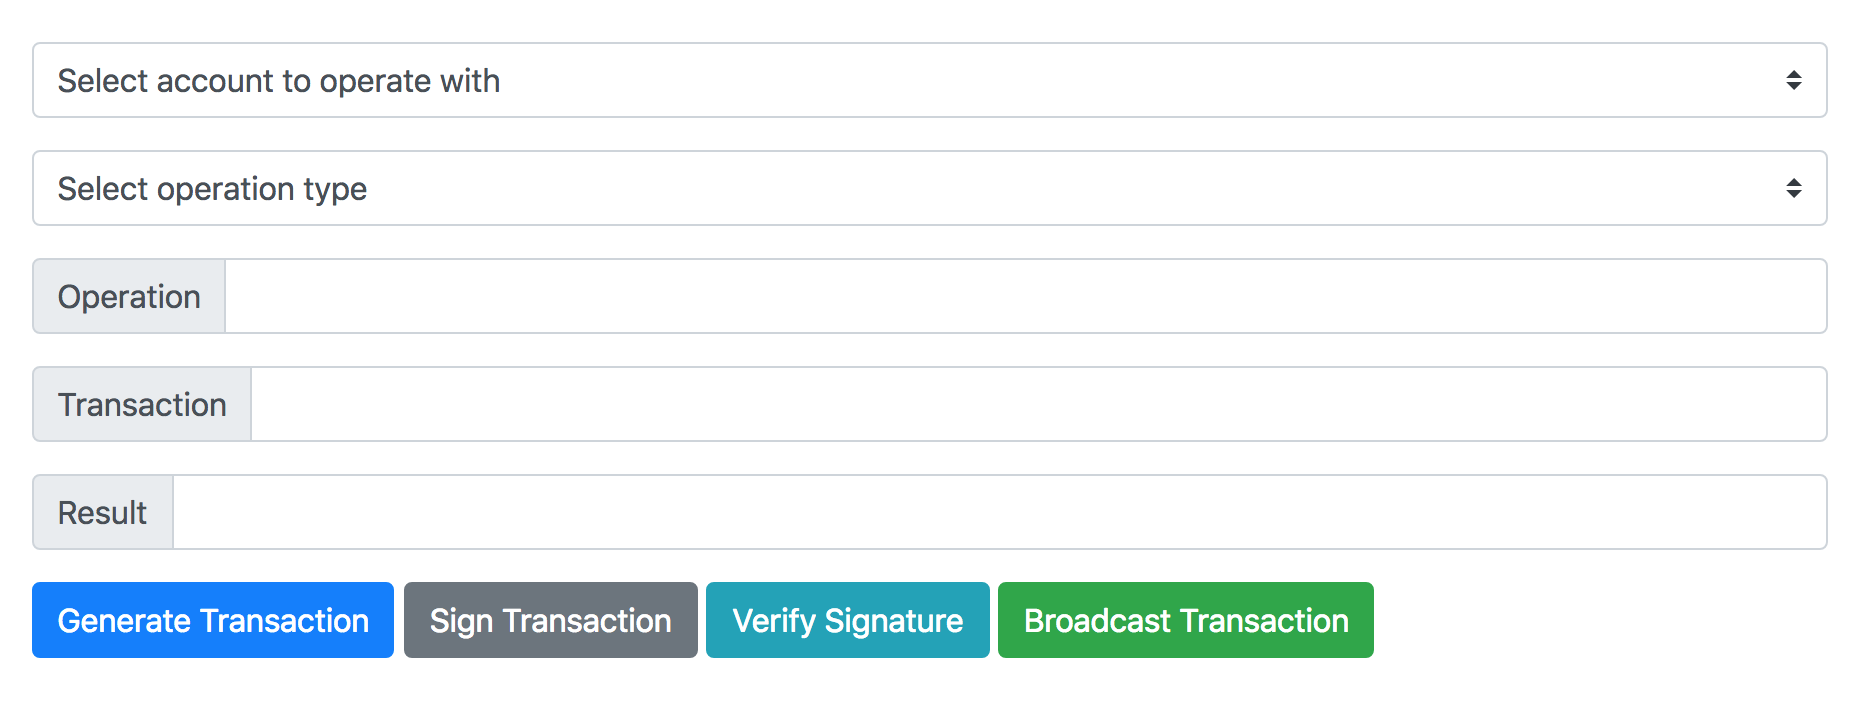
Steps
- App setup Import
dsteemintoapp.jsand prepare it to communicate with a Testnet instance of Steem blockchain - Get globals Network globals
- Account selection Select predefined account
- Operation selection Select common operations
- Generate transaction Generate transaction with selected account and operation
- Sign and verify transaction Sign and verify signature of the transaction
- Broadcast transaction Broadcast signed transaction to the network
1. App setup
Testnet and Production networks only differ with few settings which helps developers to switch their application from testnet to production. One of these settings is addressPrefix - string that is defined and will be in front of every public address on that chain/network. Another one is chainId - id of that network. By defining those parameters we are selecting Testnet and connecting to publicly available server with help of dsteem library. First few lines of code in public/app.js gives you example of connection to different networks, testnet and production.
opts.addressPrefix = 'TST';
opts.chainId =
    'd043ab83d223f25f37e1876fe48a240d49d8e4b1daa2342064990a8036a8bb5b';
//connect to server which is connected to the network/testnet
const client = new dsteem.Client('https://testnet.steemitdev.com', opts);
- Disclaimer: In this tutorial we are using testnet powered by community member (
@almost-digital) and predefined accounts reside on this network only.
2. Get globals
To test connection as well as to get parameters of the connected network, we can use getDynamicGlobalProperties function from dsteem library. Only 2 fields are in our interesting for this tutorial, head_block_number - returns head or latest block number of the network, head_block_id - returns id of head block.
3. Account selection
We have predefined list of accounts to help you with generate, sign, verify and broadcast transaction on testnet. Select list has posting private key for each account and onchange selection event we keep account name and credentials in memory. accountChange function shows example of turning plain posting private key into private key buffer format that is understandable by dsteem.
privateKey = dsteem.PrivateKey.fromString(
    document.getElementById('account').value
);
Account and its credentials should belong to specified testnet/mainnet network to sign/verify/broadcast transactions properly.
4. Operation selection
Number of operations are also predefined to show you example of operation format. opChange also keeps selected operation name in memory.
5. Generate transaction
Next we have button which helps us to generate operation object. Depending on selected operation type we have different structure for operation object. Typically, each transaction object has following fields:
ref_block_num- references block number in past, in this example we have chosen head block number, but it is possible to use a block number from up to 65,536 blocks ago. This is required in TaPoS (Transaction as Proof of Stake) to avoid network forks.ref_block_prefix- reference buffer of block id ofref_block_numas prefixexpiration- transaction expiration date in future, in our example we have set it +1 minute into futureoperations- array of operations, this field holds main information about transaction type and its structure which is recognized by the networkextensions- any extensions to the transaction to change its parameters or options
Vote operation example
op = {
    ref_block_num: head_block_number,
    ref_block_prefix: Buffer.from(head_block_id, 'hex').readUInt32LE(4),
    expiration: new Date(Date.now() + expireTime).toISOString().slice(0, -5),
    operations: [['vote', {
        voter: account,
        author: 'test',
        permlink: 'test',
        weight: 10000
    }]],
    extensions: [],
}
First item, operation type, vote and second item object with voter - account that is casting vote, author - author of post vote is being casted to, permlink - permanent link of the post, weight - vote weight 10000 being 100%, 1 being 0.01% smallest voting unit.
And output of operation object/json is set to OpInput element.
6. Sign and verify transaction
Each operation needs to be signed before they can be sent to the network, transactions without signature will not be accepted by network. Because someone has to identify operation and sign it with their private keys. Sign transaction button calls for signTx function which is job is to sign selected operation and its obkect with selected account. And output result into TxOutput element.
stx = client.broadcast.sign(op, privateKey)
Verifying transaction process is mostly done automatically but to show every step, we have included this process to check validity of the transaction signature. Verify transaction button calls verifyTx function. Function then verify authority of the signature in signed transaction, if it was signed with correct private key and authority. If verification is successful user interfaces adds checkmark next to button otherwise adds crossmark to indicate state of the signature.
const rv = await client.database.verifyAuthority(stx)
7. Broadcast transaction
Final step is to broadcast our signed transction to the selected server. Server chosen in Connect section will handle propagating transction to the network. After network accepts transaction it will return result with transaction id, block_num that this transaction is included to, trx_num transaction number, and if it is expired or not.
const res = await client.broadcast.send(stx)
That’s it!
To Run the tutorial
- clone this repo
cd tutorials/03_client_signingnpm inpm run dev-serverornpm run start- After a few moments, the server should be running at http://localhost:3000/