This tutorial will take you through the process of preparing and posting comment using the broadcast.comment operation.
Being able to post a comment is critical to most social applications built on Steem.
Intro
We are using the broadcast.comment function provided by the dsteem library which generates, signs, and broadcasts the transaction to the network. On the Steem platform, posts and comments are all internally stored as a comment object, differentiated by whether or not a parent_author exists. When there is no parent_author, the it’s a post, when there is, it’s a comment. An account can broadcast a comment on the blockchain every 3 seconds (with every new block) enabling the user to comment as they wish with almost no wait time between commits.
Steps
App setup Import dsteem into app.js and prepare it to communicate with a Steem blockchain
Choose parent post Choose a parent post on which to comment. Parse the author and permlink from it.
Post comment Send the new comment to the blockchain & render the result.
1. App setup
As usual, we have a public/app.js file which holds the Javascript segment of the tutorial. In the first few lines we define the configured library and packages:
constdsteem=require('dsteem');letopts={};//connect to community testnetopts.addressPrefix='STX';opts.chainId='79276aea5d4877d9a25892eaa01b0adf019d3e5cb12a97478df3298ccdd01673';//connect to server which is connected to the network/testnetconstclient=newdsteem.Client('https://testnet.steem.vc',opts);
Above, we have dsteem pointing to the test network with the proper chainId, addressPrefix, and endpoint.
Because this tutorial modifies the blockchain, we will use a testnet and a predefined account to demonstrate comment publishing.
2. Choose parent post
We need to choose a parent post and parse out the parent author and parent permlink.
Below is a url that uses an instance of condenser pointed at our testnet.
Every post needs a unique permalink.
Because comments don’t typically have a title, we recommend using a random number for ours.
Note: Take care of your users: Because permlinks are unique within an author’s scope, we recommend random numbers for comments; or at least making it a default in your settings.
//generate random permanent link for postconstpermlink=Math.random().toString(36).substring(2);
6. Build comment object
We take the information we gathered from the UI and put it into a well structured comment object.
We post the comment to the blockchain and render the resulting block number if successful,
or output an error to the console if there’s a failure.
console.log('comment broadcast object',comment);client.broadcast.comment(comment,privateKey).then(function(result){console.log('comment broadcast result',result);document.getElementById('postLink').innerHTML=`<br/><p>Included in block: ${result.block_num}</p><br/><br/><a href="http://condenser.steem.vc/@${parent_author}/${parent_permlink}">Check post here</a>`;},function(error){console.error(error);});
A successful comment will output something like the following to the console:
That’s all there is to it.
The broadcast operation has more to offer than just committing a post/comment to the blockchain. It provides a mulititude of options that can accompany this commit. The max payout and percent of steem dollars can be set. When authors don’t want all of the benifits from a post, they can set the payout factors to zero or beneficiaries can be set to receive part of the rewards. You can also set whether votes are allowed or not. The broadcast to the blockchain can be modified to meet the exact requirements of the author. More information on how to use the broadcast operation can be found on the Steem Devportal with a list of the available broadcast options under the specific Appbase API
To Run the tutorial
clone this repo
cd tutorials/11_submit_comment_reply
npm i
npm run dev-server or npm run start
After a few moments, the server should be running at http://localhost:3000/

JS: Submit Comment Reply
By the end of this tutorial you should know how to post a simple comment to Steem.
Full, runnable src of Submit Comment Reply can be downloaded as part of the JS tutorials repository.
This tutorial will take you through the process of preparing and posting comment using the
broadcast.commentoperation. Being able to post a comment is critical to most social applications built on Steem.Intro
We are using the
broadcast.commentfunction provided by thedsteemlibrary which generates, signs, and broadcasts the transaction to the network. On the Steem platform, posts and comments are all internally stored as acommentobject, differentiated by whether or not aparent_authorexists. When there is noparent_author, the it’s a post, when there is, it’s a comment. An account can broadcast a comment on the blockchain every 3 seconds (with every new block) enabling the user to comment as they wish with almost no wait time between commits.Steps
dsteemintoapp.jsand prepare it to communicate with a Steem blockchainbodycontent to your comment1. App setup
As usual, we have a
public/app.jsfile which holds the Javascript segment of the tutorial. In the first few lines we define the configured library and packages:Above, we have
dsteempointing to the test network with the proper chainId, addressPrefix, and endpoint.Because this tutorial modifies the blockchain, we will use a testnet and a predefined account to demonstrate comment publishing.
2. Choose parent post
We need to choose a parent post and parse out the parent author and parent permlink. Below is a url that uses an instance of condenser pointed at our testnet.
In this case.
dsf0yxlox2dwill be our parent permlink and@demowill be the the parent author.3. Add content
We’ve added the parent post info and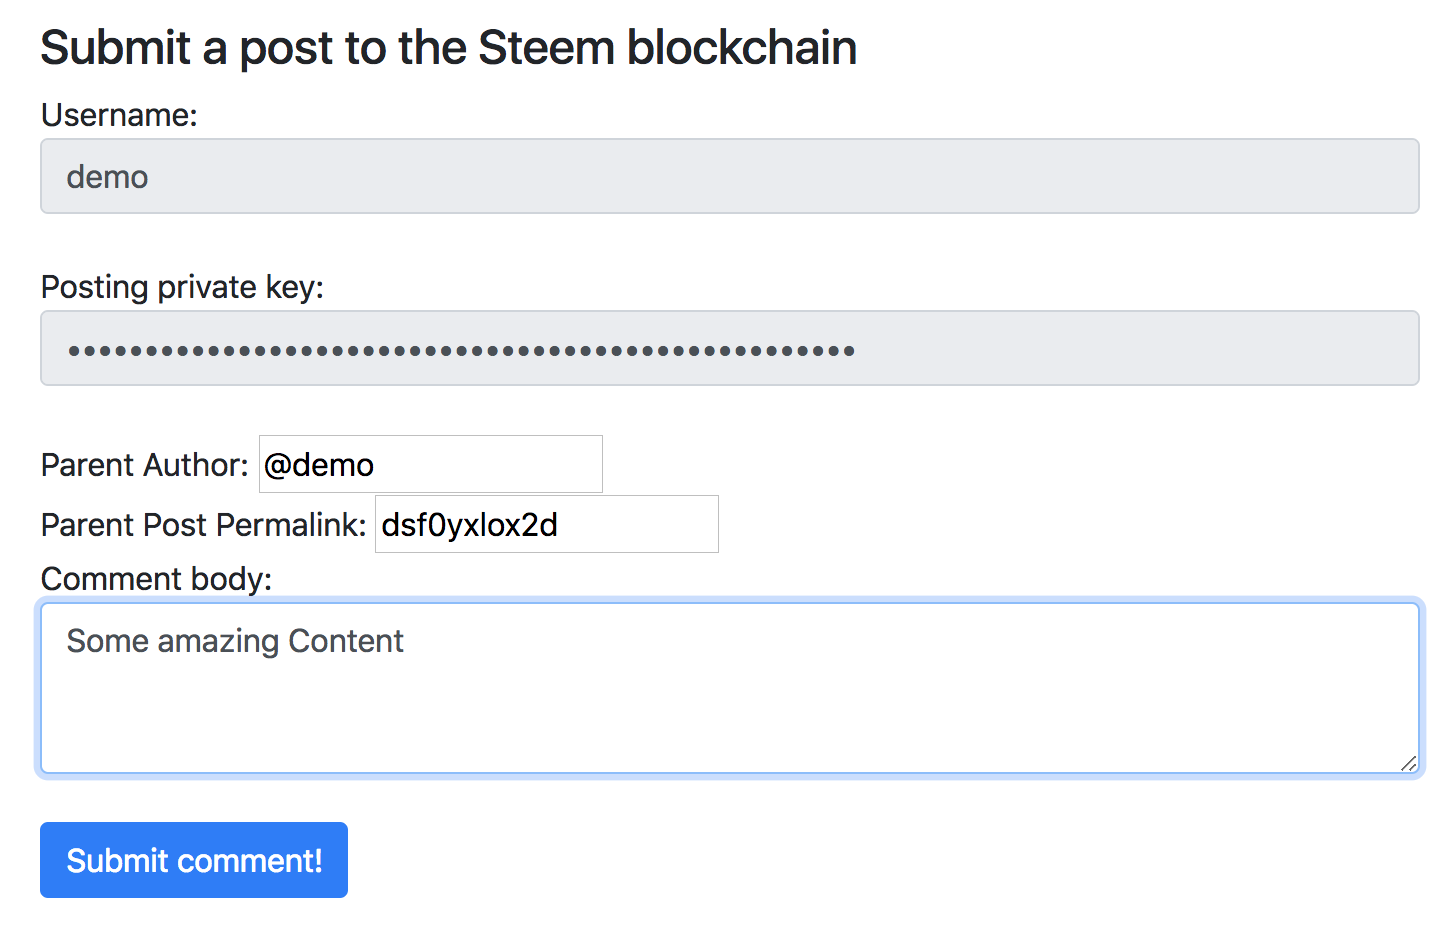
Some amazing contentin our UI via the keyboard.4. Get Comment Data
In the
submitCommentfunction, (runs when “Submit comment!” is clicked) We gather information from the UI.5. Create comment permlink
Every post needs a unique permalink. Because comments don’t typically have a title, we recommend using a random number for ours.
Note: Take care of your users: Because permlinks are unique within an author’s scope, we recommend random numbers for comments; or at least making it a default in your settings.
6. Build comment object
We take the information we gathered from the UI and put it into a well structured comment object.
7. Post comment
We post the comment to the blockchain and render the resulting block number if successful, or output an error to the console if there’s a failure.
A successful comment will output something like the following to the console: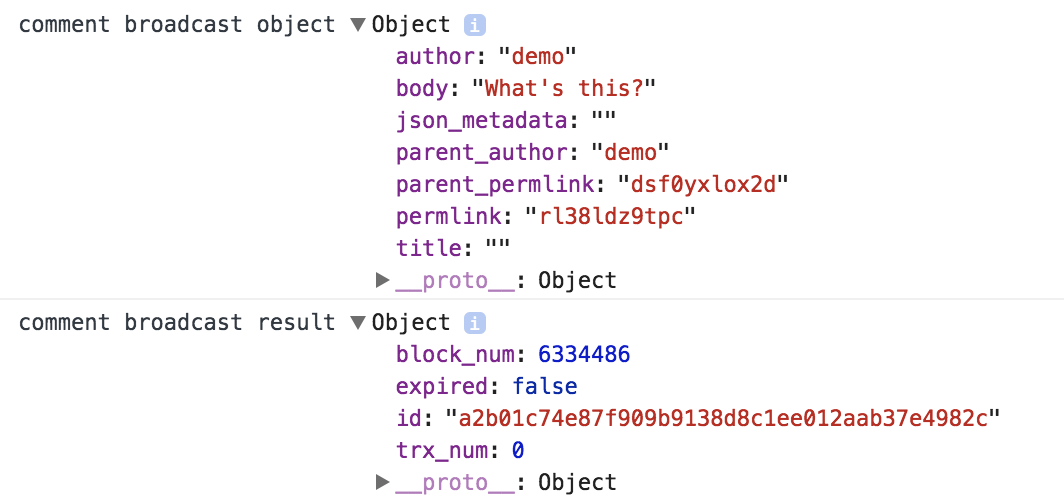
That’s all there is to it.
The
broadcastoperation has more to offer than just committing a post/comment to the blockchain. It provides a mulititude of options that can accompany this commit. The max payout and percent of steem dollars can be set. When authors don’t want all of the benifits from a post, they can set the payout factors to zero or beneficiaries can be set to receive part of the rewards. You can also set whether votes are allowed or not. The broadcast to the blockchain can be modified to meet the exact requirements of the author. More information on how to use thebroadcastoperation can be found on the Steem Devportal with a list of the available broadcast options under the specific Appbase APITo Run the tutorial
cd tutorials/11_submit_comment_replynpm inpm run dev-serverornpm run start